
Designing Maintainable Calabash Tests: Part One
Intro
As an Automated Test Engineer one of the most frustrating occurrences is the vicious cycle of broken tests (due to changes in development), or flaky tests. A result of these failures is time spent refactoring or updating poorly written tests in order to get a green build. Nobody is perfect and I have been the culprit of such mistakes, therefore I am always seeking to learn and improve my tests, in return avoiding this. If you have made the same mistakes recently, then hopefully you may find this blog useful.
In my opinion, there is no better way to design maintainable automated tests than to adopt an object-oriented/Page-Object like approach. The obvious benefit is a robust and well maintainable test suite.
Background
I have previously successfully built frameworks using Cheezy’s excellent page-object gem, which makes life very easy creating a POM using selenium-webdriver or water-webdriver. Then just over a year ago read an awesome article entitled “Roll your own page objects” by Alistair Scott, which got my head spinning with thoughts on how I could implement something similar using Calabash? Fortunately I managed to implement this on a project successfully, however it was quite painful, and as result I had to extend the cucumber/calabash module in each of my ‘screen’ (or page) classes.
After taking a break from Calabash whilst working on a web project, I have came back to using Calabash and discovered something very cool that has been implemented by Karl and Jonas at Calabash. They have built a base-class into Calabash that takes care of the plumbing needed when using a page-object model.
I loved what they had done and Karl’s cross platform examples, so I decided to expand on this, share some my thoughts and integrate some of my ideas into my own projects.
My examples are using the open-source wordpress app available for both iOS and Android.
Application Screen Objects
Given that we are working on a native application with screens instead of pages, I decided to describe my model as a screen object model (SOM). The aim of this model is simple:
- Hold elements for each of these screens.
- Easily describe elements on a screen.
- Instantiate screens in a consistent and readable manner.
- Hold methods that use the elements to perform user-actions.
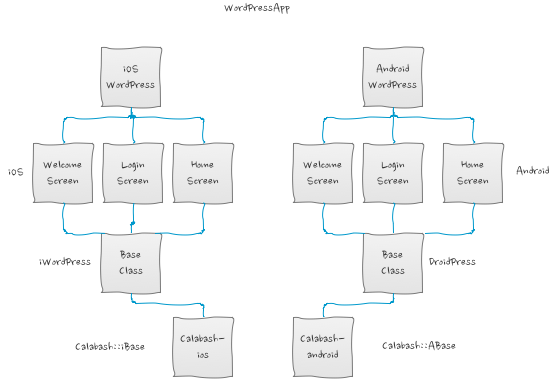
The WordPress Screen Model
Calabash Base
The Calabash base class is something you get for free with both variations of the Calabash gem (iOS and Android) and if you are to create a SOM (screen object model) it will take care of the plumbing required to use calabash with Screen Objects.
Base Class (iWordPress & DroidPress)
The iWordPress and DroidPress base screen classes are what everything else extends (iWordPress for iOS and DroidPress for Android). The respective classes contain the instantiation code common to all pages, and the class methods needed to define elements and methods.
For example:
class DroidPress < Calabash::ABase

    def method_missing sym, *args, &block
        send sym, *args, &block
    end

    def self.element element_name
        define_method element_name.to_s
    end

    class << self
        alias :value    :element
        alias :action   :element
        alias :trait    :element
        alias :activity :element
    end

 end
The Screen class
The screen class is a representation of each of the screens of the WordPress App. The aim of these screens is to easily describe elements on that screen and any actions that are explicit to that screen. Much like the aim of the traditional Page Object Model, should there be a change to an element ID or class (etc) which will as a result break tests, then a developer or QA can go straight to that screen and make the fix in one place. As well as listing elements, these screens will hold any methods related to that screen.
For Example:
class LoginScreen < DroidPress
    trait(:trait)                { "* id:'#{username_field}'" }

    element(:username_field)     { 'username' }
    element(:password_field)     { 'password' }
    element(:login_button)       { 'save' }

    value(:not_logged_in?)       { element_exists("* id:'#{login_button}'") }

    action(:touch_login_button)  { touch("* id:'#{login_button}'") }

    def login_with(username, password)
        query("* id:'#{username_field}'", {:setText => username})
        query("* id:'#{password_field}'", {:setText => password})
        performAction('scroll_down')
        touch_login_button
        performAction('wait_for_no_progress_bars')
        performAction('wait_for_dialog_to_close')
    end

end
Above we’re defining element, trait, value, and action, as well as a common method related to the LoginScreen.
When defining the elements or values we are passing in a block in the form of the ID, or query parameter by referencing the element we defined in the base class. These elements execute blocks against self; therefore the class delegates missing methods to our driver (calabash) or the screen class.
For example, we have created touch_login_button that follows the same format as above by specifying the method name, and passing in a block of code, this time calabash code for touch as well as the previously defined login_button.
The WordPress App class
The WordPress App Class is something that I decided to use as a wrapper around our screen classes. The aim of this class is to only ever have to initialize one class, reducing the amount of step definition code.
For example:
class WordPressApp < DroidPress

  def welcome_screen
      @welcome_screen ||= page(WelcomeScreen)
  end

  def login_screen
      @login_screen ||= page(LoginScreen)
  end

  def home_screen
    @home_screen ||= page(HomeScreen)
  end

end
Above we define and initialize the screens of our app, as well as create an instance variable for the screen which will be accessed from step definitions. We are initializing the screen classes using a built in method from calabash e.g. page(WelcomeScreen). This is the equivalent and more readable way of initializing a class like WelcomeScreen.new(self).
Accessing Screen classes from Cucumber Step Definitions
When writing Cucumber step definitions it is generally good practice to stick to writing them at a high level. By this I mean calling screen methods, values or actions instead of directly accessing elements themselves from step definitions. Another advantage of writing tests in this way is that the Features & step definitions can be used cross platform, i.e. use the same step definitions for both iOS and Android.
For example:
  Given(/^the app is launched$/) do
    @screen = page(WordPressApp)
  end

  When(/^I login with (valid|invalid) credentials to Add WordPress.com blog$/) do |negate|
    @screen.welcome_screen.await
    @screen.welcome_screen.touch_add_blog
    @screen.login_screen.await
    @screen.login_screen.login_with(USERS[:valid][:email], USERS[:valid][:password]) if negate.eql? 'valid'
    @screen.login_screen.login_with(USERS[:invalid][:email], USERS[:invalid][:password]) if negate.eql? 'invalid'
  end

  Then /^I (should|should not) be logged in$/ do |negate|
    if negate.include? 'not'
      @screen.login_screen.should be_not_logged_in
    else
      @screen.home_screen.await
      @screen.home_screen.should be_logged_in
    end
  end
Initializing the WordPress App class in this way will provide us with all of the screens, subsequent elements, actions and methods for each screen which will be accessed using the @screen instance variable.
Summary
A lot of the page-object plumbing is already done for you with calabash. What I have done is extended on this, defining screens, actions and methods related to screens in the same way Alistair Scott had done for his Watir-Webdriver examples.
If done correctly projects could benefit from a robust, maintainable, and easily readable automated test suite.
I hope you enjoyed reading. All of the above example code can be found here on GitHub.